Building a Mechanical Keyboard

Over the last couple months I spent time building a custom mechanical keyboard with my friend Leivur. It started an excuse to get together more often, but I’ve learned a lot from the experience, not just about the somewhat quirky and niche world of mechanical keyboards but about the possibilities in the future of technology in general. I thought I would write up the process from start to finish for anyone curious, and a few other things I’ve learned along the way. Unfortunately this isn’t a detailed how-to guide, but more of a high level outline of what’s involved!
Preparing to build
First we got together and Leivur walked me through the decision making process for designing the keyboard. I’ve only done it once so I don’t remember all of the details, but this included things like keyboard size and layout, keycap design and shape, and switch type. Each main decision was informed by many more detailed considerations and unique implications of various combinations of choices. I definitely could not have done this step (or any of this as quickly as I did) without Leivur’s experienced guidance, so my first recommendation is to find a friend to help if you want to build a keyboard, or be prepared to do a lot of research online.
The interesting part about this was that so many decisions had to be made up front. Parts had to be ordered, they all had to be compatible with each other, and they all had to fit into my own needs and preferences. Essentially the entire keyboard had to be designed first before moving on to any other step. This is an unusual experience for me as someone who typically works with software or other forms of design where decisions can be made along the way rather than deciding everything up front. Definitely one of the interesting unique challenges and constraints of hardware design.
I ended up getting almost everything I needed from KBDfans which is a great one-stop online store for beginners like me. More experienced keyboard builders often participate in group buys where an individual designer will take pre-orders for a specific new case design and then ship when they’re produced (often 6-12 months later), which was more involved than I wanted to get as a beginner but a cool part of the community!
Switches and stabilizers
Once the parts arrived, Leivur walked me through prepping the switches and stabilizers—the metal and plastic parts inside the keyboard that move the keys. This mainly involved lubricating them to control the feel of the keys later when pressed. Leivur gave me many small detailed tips to get the best overall feel, things that otherwise would have taken me a lot of time and more experience to pick up on. There are a lot of switches, so it took about six hours total to prep all of them over three sessions.
Assembly
Once the switches were ready, we were ready to assemble the board. This was tricky because we needed to figure out the correct alignment of the switches in the circuit board, and make sure the board, case, and switches were assembled tightly and evenly. To do this we used a soldering iron, so it had to be done carefully to avoid the annoyance of taking it apart again.
Programming
We plugged in the keyboard and discovered the keyboard actually worked! There was a possibility after all this work that there would be an issue and something would need to be fixed, but we were lucky enough that everything was fine. We used keyboardtester.com to confirm each key.
However, the keys weren’t necessarily mapped in the right way for my Macbook, and I wanted to be able to customize the key mapping in general of course to make it fully adaptable to my workflow. This means I needed to update the keyboard’s firmware, the read-only programming stored directly on the keyboard. To do this, I used QMK, an open source firmware tool. Thankfully I have lots of programming experience and I was able to configure and update the board in about three hours of problem solving. If I didn’t have experience with this type of thing I definitely would have gotten stuck for at least a week. There is lots of documentation for QMK, which is great, but a lot of it is pretty cryptic. The thing that helped most was finding forum write ups for my specific keyboard model. Once everything was set up once the process became pretty simple, but set up can take a while!
Essentially the process is:
- Install QMK and related software
- Write the firmware code (or use an online generator
- Put the keyboard into bootloader mode and “flash” the firmware to the board (specific steps vary by board).
The reason QMK is important is because it allows you to program the keyboard’s actual firmware instead of re-mapping keys in your computer operating system. This helps even out any software-specific mapping issues and makes each key reliable. Plus, you can program cool color patterns if your keyboard has LED lights!
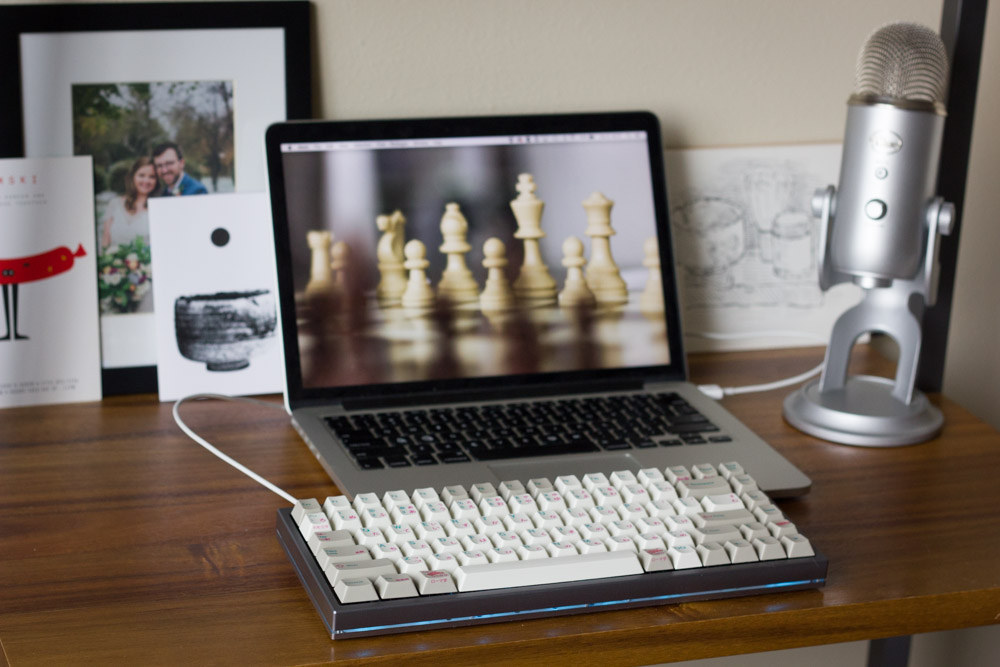
The end result
Here are some photos of the results!


What I learned
Reactions to the idea of building your own custom computer keyboard are… deeply varied. Many people don’t see the point. Others find it incredibly fascinating.
Everything goes through a cycle of being hand crafted to being mass produced to new hand crafting techniques living alongside mass produced options. Early personal computers were hand crafted similar to how these keyboards are now designed and built, famously in the Homebrew Computer Club that gave birth to Apple. The social web started as hand crafted personal websites and blogs and has grown into centralized sites, and is hopefully beginning to move toward more independent domains again. Bread was hand crafted in small communities for thousands of years before the industrial revolution, then became Wonder Bread, and is now both hand crafted and available in large commercial quantities.
My point is that the era of mass produced consumer technology may be splitting into more visible hand crafted versions of technology living alongside the mass produced and universally designed options from companies like Apple. In a mature space, both small, custom options and manufactured large scale options are both available to the market. One isn’t better than the other, but they meet people’s needs depending on their situation.
Right now this hobby/market is pretty niche, but I could see the concept catching on in the technology market in general. Right now the main way people personalize their phones is to choose a case, and the Apple Watch is an early example of more personalized options in the design of personal computers.
This hand crafted hardware niche combines the design contributions of Apple with the early homebrew computer mindset. In order for the trend to catch on with a wider audience, more resources for beginners and more accessible tools and products would need to be created, as well as more storytelling about the benefits and value of designing your own tools.
For me right now, as a software engineer having a customized keyboard is a huge benefit to my daily work, and I can imagine the value of applying that same personalization to my overall programming environment.
If you’re curious about doing this yourself, feel free to reach out on Twitter and I’ll try to help—I don’t have much experience but I may be able to point you in the right direction!
Published

Kevin McGillivray is a web developer, painter, and writer in Wisconsin. He writes about creativity, online and offline neighborhoods, and vegetables. He paints and dives.